Shingeki no Kyojin - Levi - 5 (Flower Shop) - Progess


I made this to show the steps of the very first Garage Kit I ever made! I've made a custom figure before using my 3D printer, and I regretted not keeping pictures of my process:


(Finished 3D print)

So when I decided to do my first Garage Kit, I made sure to take photos to document start to finish. I then came here to post the pictures!


(Opening of the box, and Manga cover for reference)


(Here are the pieces after cleaning and trimming. I also started adding my first pins)


(The boots are the very first pieces I painted. I figured it was best to start easy!)


(Next I began Levi's head. This is him after the primer and goop to keep his eyes and mouth clean from the airbrushing. You can also see the tape I used to cover his hair)


(Shading and sealing of his boots!)


(Here we have his legs and parts of his ODM gear. Pants and skirt were airbrushed - belts and ODM were hand painted)


(The first pieces coming together with resin! Happy day)


(Added the ODM pieces and bottom half complete)


(The swords were straight rectangular pieces of plastic I had to angle cut and carve the blade lines. I had a really good idea of what they needed to look like, as I have made a complete ODM and swords cosplay!)


(Hand painted handle and painted cut blade)


(Levi has a face! This is my 2nd attempt. The first one wasn't terrible in the beginning, however once I tried the shading it looked really bad. I stripped the paint and started over. This is the result. Went easy on the blood for now. In the background you can make out the back part of the hand painted ODM gear, his midsection after airbrush painting the shirt, and cravat)


(Hands all done!)


(Hand painted belts on his shirt)


(Finished hand with blade, as well as beginning of his hair)


(Hair painted and added to head)


(Midsection attached, as well as jacket and cravat) 


(Arms. I ended up stripping the paint and redoing the right arm as it came off darker initially. I think I may have mixed the paint a little differently. I had to hand paint the Wings of Freedom patches as the original figure did not have them)


(Added more blood to his face. Although the original figure photos had less, I felt it needed a little more if I was going to go by the Manga cover which I liked better)


(First arm attached and blood added. Poor Levi)


(Second arm attached!)


(Beginning the base. I 3D printed the base and added clay to give it a foundation and texture)


(Once the clay dried, I added glue a section at a time, and painstakingly applied the fake grass with tweezers)


(End result. It came out so much better than I had hoped, and feels like real grass!)


(Blade added to hilt of sword. Back ODM gear attached as well as the sword sheaths. Paint sealed)

(Blood drops added to sword that goes on the ground)


(Airbrushed cape. It naturally had the shading when I was done so I was very happy about that! Like the sleeves, no Wings of Freedom, so I hand painted the patch)


(Sealed paint and attached cloak. Almost there!!)


and one head attachment later.....


I AM DONE!!!!


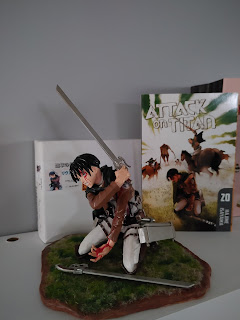
Captain Levi is now ready for his new home in my soon to be built 2nd glass display case (I ran out of room in my first). It's not perfect, but honestly for my first attempt I don't think it's half bad! I am working on more 3D prints, and since Garage Kits are fairly easy to take apart and strip the paint, once I get more practice I may do just that and try to make him a little more perfect! 😋


Comments